European Air War
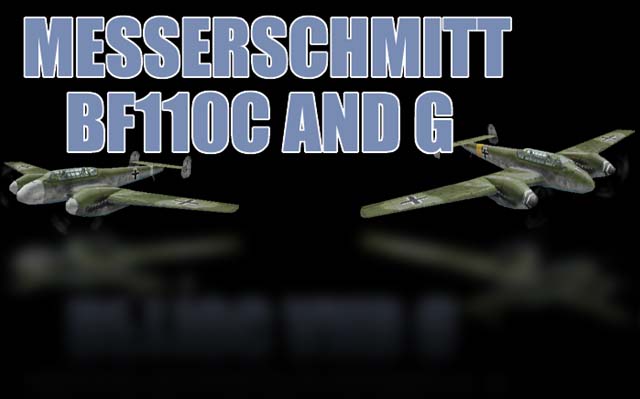
Messerschmitt Bf.110
The Bf110 was originally designed as a strategic fighter, intended to escort bombers to their targets and back. When it first flew in 1936, it was considerably faster than single-engined contemporaries, but suffered from poor maneuverability and acceleration. The 110 earned a favorable reputation over Poland, but fared poorly during the Battle of Britain. Using high-speed hit-and-run tactics initiated from above 21,000 feet, the Bf110C could hold its own against the Hurricane Mk I and Spitfire Mk I. In a slow speed fight (typically during medium-altitude bomber escort sorties), however, the British fighters literally shredded the 110C to pieces. The 110G changed to the bomber interceptor role, and initially performed quite well against unescorted B-17 Flying Fortresses and B-24 Mitchells until the introduction of P-47 escorts. The slaughter of Bf110s by the P-47 dwarfed the losses sustained by the Luftwaffe in 1940. By far, the Bf110G was most successful as a radar-equipped night fighter, intercepting bombers in the dark.
As learned during the Battle of Britain, the Bf110's only hope of survival is to keep airspeed high, execute hit-and-run attacks from high altitude, and avoid lengthy turning battles with single-engine fighters. In a classic turning fight, the Spitfire Mk I will easily emerge victorious. The Bf110G is similarly outclassed by its contemporaries, and is best used as a bomber interceptor at night or against unescorted bomber formations. As evidenced in 1939, 1940 and again in 1943, the Bf110 is little more than cannon fodder in the one-versus-one fight.
Messerschmitt Bf.110C-4
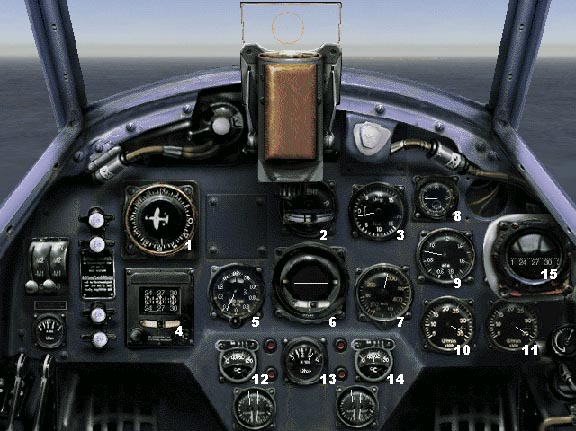
1. Repeater Compass
2. Turn and Bank Indicator
3. Rate of Climb Indicator
4. Gyro Compass
5. Altimeter
6. Artificial Horizon
7. Airspeed Indicator
8. Clock
9. Manifold Pressure Gauge 1
10. Tachometer 1
11. Tachometer 2
12. Engine Temperature Gauge 1
13. Fuel Gauge
14. Engine Temperature Gauge 2
15. Magnetic Compass
- Wingspan: 53 ft. 5 in.
- Length: 39 ft. 9 in.
- Height: 11 ft. 6 in.
- Wing Area: 413 sq. ft.
- Engine: 2 x Daimler-Benz DB601A rated at 1,100 hp.
- Fuel: 335 gal. internal
- Loaded Weight: 14,884 lb.
- Wing Loading: 36 lb./sq. ft.
- Maximum Speed: 349 mph.
- Service Ceiling: 32,800 ft.
- Rate of Climb: 2,200 ft./min
- Combat Radius: 180 miles
- Armaments: 2 x 20mm MG-FF cannons, 4 x 7.92mm MG-17 machine guns, plus 1 x 7.92mm MG-15 machine gun in rear cockpit
- Ammunition: 180 rds/gun (20mm), 1000 rds/gun (forward 7.92mm), 750 rds (rear 7.92mm)
Messerschmitt Bf.110G-2 (View Cockpit)
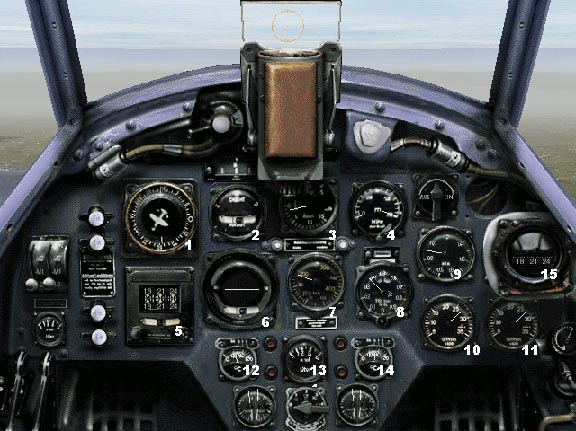
1. Repeater Compass
2. Turn and Bank Indicator
3. Rate of Climb Indicator
4. Radio Altimeter
5. Gyro Compass
6. Artificial Horizon
7. Airspeed Indicator
8. Altimeter
9. Manifold Pressure Gauge 1
10. Tachometer 1
11. Tachometer 2
12. Engine Temperature Gauge 1
13. Fuel Gauge
14. Engine Temperature Gauge 2
15. Magnetic Compass
- Length: 39 ft. 9 in.
- Height: 11 ft. 6 in.
- Wing Area: 413 sq. ft.
- Engine: 2 x Daimler-Benz DB605B rated at 1,475 hp.
- Fuel: 335 gal. internal
- Loaded Weight: 15,430 lb.
- Wing Loading: 37 lb./sq. ft.
- Maximum Speed: 343 mph.
- Service Ceiling: 36,300 ft.
- Climb Rate: 2,500 ft./min
- Combat Radius: 180 miles
- Armaments: 2 x 20mm MG-151 cannons, 4 x 7.92mm MG-17 machine guns, plus twin 7.92mm MG-81 machine guns in rear cockpit
- Ammunition: 375 rds/gun (20 mm), 1000 rds/gun (forward 7.92mm), 800 rds (rear 7.92mm)
Notes: Both variants suffered from poor acceleration characteristics, which make them very vulnerable in low, slow dogfighting situations. Pilots countered this by forming defensive circles when confronted by single-engine enemy interceptors, but even these tactics were only marginally effective against determined adversaries. The Bf110G has multiple configurations. For Escort and Fighter Sweep missions, you should fly in a clean configuration. For Strike missions, you have the option of two 500kg bombs (the best configuration), two 250kg bombs (which makes you slightly more maneuverable when intercepted), or four 210cm rockets.
This material was included in the original 1998 release of European Air War by Microprose.