F-22 Total Air War
Campaign
MiGMan thanks FlyingSingerfor this overview and guide.
Total Air War (TAW) is an aptly-named product.
More than a combat flight simulator, it offers a strategic component based on modern air warfare theories first applied in the 1991 Gulf War. In addition to a detailed simulation of the F-22 fighter, TAW simulates a near-future war in the Red Sea region (northeast Africa and Saudi Arabia). It does so many things so well, that the player could easily concentrate on any of several single aspects of the sim and still find a lot of depth and fun.
Some of the parts that make up TAW include:
- Excellent terrain and object graphics, special effects, sounds, and communications.
- Basic flight and operations such as navigation, landings, and aerial refueling.
- Dogfight training and "custom combat" against many aircraft types, with ACMI recordings to help you learn from your mistakes.
- Training missions covering all aspects of F-22 flight and combat, including many AA and AG weapons as well as wingman operations.
- AWACS training and campaign missions allow you to view and control the air war from the theater commander's perspective (and jump into any F-22 on the map by simply double-clicking it).
- Fully dynamic campaigns (10 of them!) with many mission types -- replay value is endless, although there are many missions of similar flavor.
- Detailed planning and control over every aspect of campaign missions.
Because the campaigns are dynamic, they are different every time, but some approaches will work better than others.
Check out the DID-US TAW Guide pages, they really have a lot of valuable stuff on how to approach the campaigns. There's quite a lot in the text itself but many of the best tips are "Post-It" notes on the expanded versions of the graphics.
NOTE: As of mid - 2001 the did sites were no longer up.
Pilot Log File
In campaigns, TAW limits the missions you are allowed to fly based on the experience level of your pilot.
Newer pilots can only fly "one star" missions such as CAP and escort flights with little chance of enemy contact. As you successfully complete missions, your active pilot gains points that eventually allow access to more difficult (3 or 4 star) missions, including strike flights, anti-AWACS, SEAD/Wild Weasel, etc. You can build up points faster by volunteering for scramble missions. Press the scramble button to do this -- if it is on, a dialog box will pop up when a scramble mission is needed, giving you a chance to fly it. Take off quickly, because scrambles are only generated when incoming threats are VERY close to the base (if you choose not to fly scramble missions, the AI flights will take them).
This system certainly follows real-world logic -- new pilots may initially be assigned some "routine" missions to expand on their training and build up skills. But mission success also requires returning safely to base and landing. If you destroy all the mission goal targets and are later shot down, ejecting or getting killed, you fail the mission and points are subtracted from your pilot's score (the "pilot" in TAW is you, but not literally a single in-game persona -- if your pilot is killed, the mission is failed, but the campaign continues). You can have a few bad missions and get knocked back down to the point of flying only one-star CAPs again.
Frustrating, but there is a solution.
This special LOGFILE.DAT can be placed in the pilot subdirectory of your TAW installation folder, replacing the default LOGFILE.DAT there (make a backup copy of the original if you wish - it's a binary file so you can't view and edit the contents directly). The new file creates a pilot record with 100,000 points, allowing you to fly any mission in a campaign.
Realism
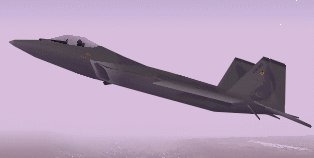
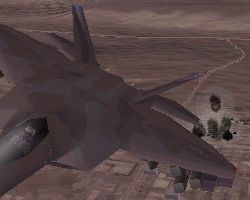
The F-22's six-degree-of-freedom flight model feels like a real airplane, albeit a powerful and smoothly-responding one.
The integrated avionics and HUD modes are somewhat different from many other jet sims, but are detailed and easy to learn and use (they represent DID's educated guesses at how the real F-22 systems will operate). There are many types of weapons, probably more than will be used on the real F-22, in the interest of game play variety.
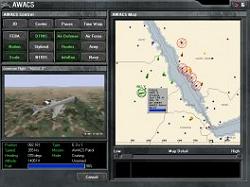
AWACS Mission Walkthrough
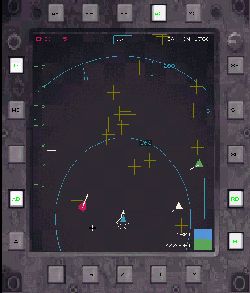
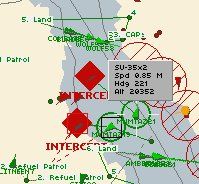
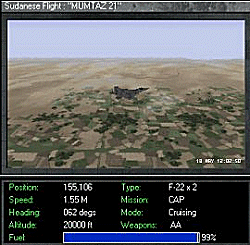
The AWACS module in TAW is a great feature. It lets you view and control the air battle from the perspective of the battle commander aloft in the E-3 AWACS aircraft. The map-based interface is easy to use - all information is available at a glance, and you can query flights and order various actions using only the mouse.
You must watch for developing threats, ordering flights to visually identify unknown contacts, intercept hostiles, or escort friendlies. You can also move assets to new CAP positions, order flights Back to base, or provide vectors for refueling to thirsty returning flights.
How did Eritrea and Somalia get to have so many modern fighters? In TAW, the premise is that huge oil reserves are discovered in northeast Africa, leading to rather sudden wealth and instability.
The 10 campaigns are essentially "what-ifs" based on this idea, with various alliances and starting points. In campaigns, these newly wealthy countries never seem to run out of first-line fighters!
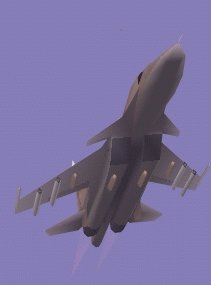
The Sukhoi-30 is a variant of the Su-27 Flanker
Stealth
The F-22 is designed for stealth, but if you want to exploit this, you must carry only internal weapons and fly carefully around EWR and SAM sites. You can carry large loads of external stores, giving you more weapons and options. You give up stealth but gain in flexibility and game play options (the real F-22 has weapon-capable external hard points, but they are intended mainly for fuel tanks for long-range ferry flights). You can change weapon loadouts (and many other things) in campaign missions, but not in training missions.
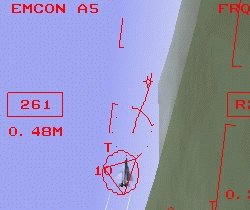
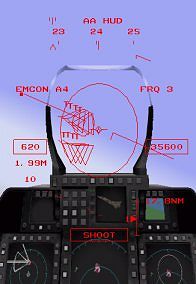
Related to stealth is EMCON (emissions control), with levels from 1 (no transmissions) to 5 (full radar and comms use). EMCON can be handled automatically or manually. The automatic system tries to use the minimum necessary transmissions based on the tactical situation. You need at least EMCON 2 to use the radio to contact your wingmen.
Shoot List
There is a separate shoot list for each type of weapon.
When you select AIM-120R (extended range AMRAAM), press T to build the threat-prioritized shoot list for this weapon. The AIM-9X will have a separate shoot list. Press U to clear the current shoot list. You can also add padlocked targets to the shoot list, or manually add targets by clicking them in the attack MFD radar display. Cycle through the shoot list with the C key.
There are three difficulty levels that affect enemy AI and weapon effectiveness. At easy and medium levels, required mission goals are identified with a "T" in the HUD and in the identifier block in MFD's. This is quite useful as there are normally many potential targets, and identifying the required targets can be a problem without the T's (of course this is realistic, but it's not much fun).
Although an expensive, stealthy "air dominance fighter" like the F-22 should despatch most threats with BVR missiles, use of the gun is still an important skill.
Besides, gun kills are fun!
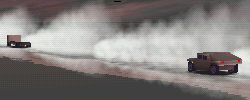
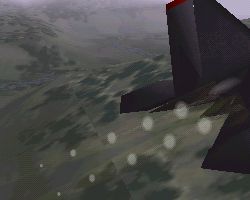
Dogfight
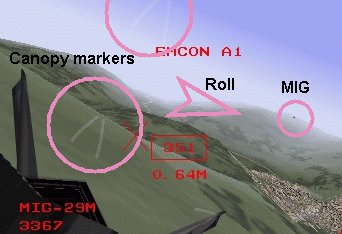
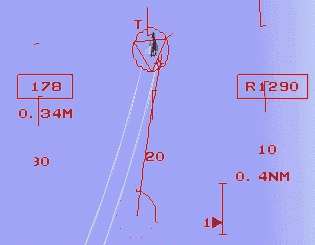
Target PADLOCKED at 6 o'clock
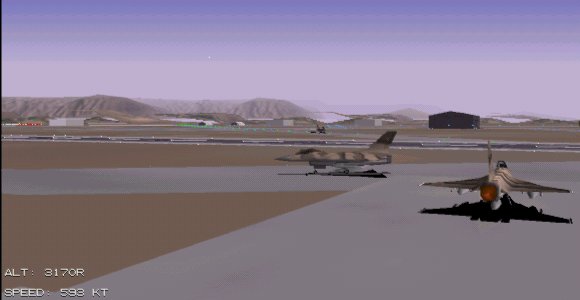
You start out at over 500 knots, WAY too fast -- you will have a huge turning circle and will soon black out if you simply start pulling 9G into the bandit at this speed.
Use speed brake and throttle to slow down below 300 knots as you lock and padlock the bandit.
Observe the MiG's position relative to your canopy markers (translucent V's on your canopy, pointing toward your HUD). Roll to put the bandit near the narrower legs of the V's, near the centerline of your canopy. This puts your lift vector on the MiG so you can pull into him.
Apply power as you pull so you can stay between 200 and 400 knots. Don't forget to retract your speed brake.
If your stick is set up to switch quickly between the front view (F1 - a second press will give the HUD-only view) and padlock threat (F3 - a second press will give an external player-target view), you can more easily maintain Situational Awareness.
Listen for Bitchin' Betty's "ground proximity warning" and check the F1 view often. This is a low altitude fight and it's easy to become a lawn dart if you just stay padlocked on the target.
Lag pursuit
After one or two turns you should be able to get behind the bandit, using throttle and speed brake as needed to control closure.
Try to line up so you are turning in the same plane of motion as the MiG. Stay slightly in lag pursuit (VV behind the bandit's tail) until you can close the range to around 0.3 nm.
Now you can think about getting a shot. You need to pull your nose into lead, dragging the "snake" through the bandit's path and placing the pipper just ahead of him before opening fire. If you line it up well, the bandit should fly through most of your bullet stream.
When you end the mission, press the ACMI button to view the results. Try different views, using the left scroll bar to control zoom and the right to control the length of the "tails" that help you see the paths.
Notice if you were turning in the same plane when you fired your gun. If not, you can be close and still only get a "snap shot" with few shells hitting the target. Use the "Spin" view to help visualize the 3D geometry. You can save the ACMI file for later viewing (press Save).
Thrust Vector
The F-22 has rotating engine nozzles for "thrust vectoring."
This can really help turn performance, and in the real jet, the FCS automatically controls this with normal stick inputs to0 give the best turn possible.
In TAW, you must hold down the ~ (tilde) key to activate vectored thrust. This will briefly help your turn rate at slower speeds, but if you apply it in a high G turn, it will quickly bleed your forward speed to 100 knots or less.
Use vector thrust sparingly, when you need just a few more degrees to pull enough lead for a shot.
Control
You are not running the entire air war - the AWACS has no control over strike flights and cannot order flights on the ground to take off (they will scramble on their own when their bases are threatened).
There are further options in the War Room during campaigns, but still less than total control).
But you are basically in control of all airborne assets, and you can double-click an F-22 flight any time and jump into the cockpit to fly it yourself.
In fact, if you have a priority situation such as a hostile that sneaks in close to your AWACS (hey, that’s YOU in there!), it’s best to jump in and fly the mission (after you order the nearest F-22 to intercept) , since you can’t order anything other than the basic intercept (i.e., you can’t order a “buster” maximum speed intercept).
If the only assets in range are not F-22’s, you’ll have to let the AI fly the mission.
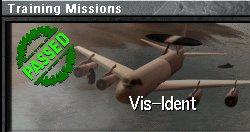
In this training mission, you must order a visual ID (vis-ident) on a number of unknown contacts (yellow on the map). Once you have visual-ID (they will then display as red), use your fighters to ensure the destruction of the required enemy aircraft and the survival of your major “high value assets” (E-3 AWACS, E-8 JSTARS, KC-135 tankers). You should also try to preserve your fighters as well, though it seems you are not penalized for losses of non-goal aircraft.
Friendlies are green, hostiles are red, neutrals are blue, and unknowns are yellow on the map.
Place the mouse over a flight to see flight info, or click it to see more detailed info (including fuel and weapon status for friendly flights).
Zoom in with shift plus the left mouse button (select area). Zoom out with shift plus right-mouse.
Orders are given by clicking on the friendly you wish to use, then dragging to the action point.
If there is no object, you move the flight to a new CAP position.
If you drag to an unknown, a vis-ident is ordered.
Drag to a friendly to escort (or refuel if the aircraft has called for fuel and you vector it to a tanker).
Drag to a hostile to engage it.
Drag to an air base to land the flight.
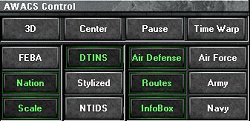
In addition to the map (which can be displayed in 2D or 3D), you have a panel of buttons to control display of air defense ranges, air/ground/naval objects, aircraft routes, and choice of symbol types.
You also have a 3D view of any selected object on the map (other than unknowns - that would be cheating!).
When you order an action, you hear an authentic-sounding order (also displayed as text in the lower right of the screen).
You can speed up the action with “Time Warp,” but watch carefully - and you can’t give orders while in time warp.

Move the CAP location of E-3, E-8, and KC-135 flights if they are in range of any hostile flights - these flights must survive or you will fail the mission. They have escorts, but you may need to use some of them for urgent intercepts.
You won’t see many airborne unknowns right away, but move some of your CAP flights toward the enemy borders to shorten the distance they will fly when you start to order the visual ID’s. Once they have an ID, they will turn away and request instructions. If it’s a hostile, you need to order the intercept. You can get SOME idea of hostile intent from the speed and heading of the unknowns, but this is not completely reliable.
There is no way to see the status of required targets from the AWACS interface after the initial briefing. You can get around this by jumping into an F-22 (double click on one, ESC ESC to return to AWACS).
In the F-22, you can press the numpad-. (decimal point) key to get a list of goals and their status. If a hostile is on your radar (attack MFD, numpad-2), place the mouse cursor over it to see ID info in the lower left corner. In easy or medium difficulty, the name of the flight will display and a (T) will appear for “goal” flights.
The hostile intent of near-by bandits is clear, but in this mission, some of the required targets are yellow “unknowns” far inside enemy or even neutral territory. You’ll have to send CAP flights in to vis-ident them and intercept them if they turn out red. Not all goal aircraft will necessarily be airborne at the start - you may have to play for quite a while to get them all (my mission time was over 2 hours, much of that compressed with Time Warp).
Pay attention to range and speed - F-22’s are fast, but they still take time to cover a few hundred miles. You can display a scale bar on the map (Scale button on control panel). If the target is out of fuel range, the pilot will tell you this - but he won’t say if he’s 30 minutes away! Check the fighter’s fuel status before you order a long range intercept.
Urgent Shield
Well, I won my first campaign in TAW last night. It's possible that this is the first campaign I have EVER completed in a sim (I think I may have completed one in Marine Fighters back in '95, not sure.
The TAW campaign was "Urgent Shield" which has the US and Russia defending Eritrea against Ethiopia, backed by China. It's a "one star" (easy!) campaign (there are 10 campaigns in all, up to 4 star difficulty), and I won it after 63 game-hours -- two phases, the anti-EWR/C4 phase (degrade by 20% in 15 hours) and the anti-air forces phase (degrade by 60%).
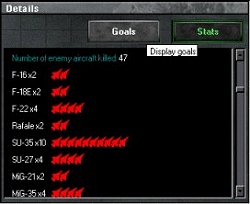
Allied losseswere rather brutal too -- this was no Desert Storm! I actually lost more missions than I won, of the F-22 flights (won 12, failed 26 -- but you fail if you eject or don't land at your home base, even if you meet all the other objectives -- and the AWACS you kill is still dead, even if you "fail"). I won most of the many AWACS missions I flew. My active pilot now has 196 kills and several medals (but also 17 KIA's!). When the air force losses reached 63%, Eritrea and China called a cease fire and I got a "you won the war" screen. Cool
Dynamic campaigns like this really have a lot of "surprise factor." There are the odd cake-walk missions (scramble to down a single in-bound MiG-21), and some rather urgent moments too.
In one late mission, I took out the control tower of one of the two still-active enemy airfields. They still managed to sortie quite a few Su-27s and even Su-35s, so my wingman and I were quite busy, and my escort flight (F-14) even helped a bit (one thing TAW lacks is ability to ask non-wingman flights for help -- they often get distracted by bandits near the base who are not mission-threats and should be handled by CAP or scrambles by the AI). I finally managed to reach the target and keep the LANTIRN/laser on the tower for a hit.
I had saved one AMR and one 9X for egress, but quickly used them up, then ran toward home at 800 kts, 300 feet with an Su-27 radar-locked on my tail for 100 miles! He must have been down to guns only too, but he had friends near by, so I decided to keep running. He only gave up when I overflew an allied base - SAMs must have discouraged him. Landed with Bitchin Betty yelling non-stop about my low fuel.
In another one, I jumped into an F-22 from the AWACS screen and quickly took out 3 or 4 Flankers. I also hit a MiG-21 and he was burning and heading for the weeds -- I followed him down for a while and fired a few gun shots, hitting him a bit more. This was at night, and in the FLIR he seemed to be really burning. But after I turned Back toward base, he flew back up and shot me! The old U-boat trick, playing dead maybe? I had to eject -- I even had a 9X left but didn't want to "waste" it on a lowly MiG-21 that was already burning and apparently losing altitude. Not sure if this was a deliberate fake, but it sure seemed like it! I should have waited for "my" voice to say "splash 5" which is the only sure way to confirm a kill.
The 63 game-hours took maybe 6 real hours over several days -- I used the skip (war room) and time warp (AWACS) buttons a lot. I realized near the end that in the AWACS, you DO have some control over strike forces. If a strike is en route, you can direct it to a different target. Had I realized this earlier, I could have perhaps used some of the many failed anti-airbase strikes to take out the three pesky EWR sites that survived phase 1! This would have cut my losses I suspect, because even though I killed the Chinese A-50 AWACS every chance I got (that's a fun mission too, sneaking in with a stealth-AA load to get the A-50 deep in enemy territory), they still had EWR coverage over most of their territory.
BTW, the mission planner feature for campaign flights is REALLY cool in this sim -- you can change the makeup of your flight (though in this campaign, every request for additional aircraft was denied -- they were usually pretty fat packages anyway). You control the loadout of all flights, the waypoint routing, the target, and the attack profile. You also get satellite photos of most of the targets.
Well, Back to the real world. I really like TAW a lot -- oh yeah, I also have to mail you that "fly any" pilot logfile -- that also helped me win, because I could leave many of the simple CAPs and escorts to AI and take some of the Wild Weasel and strike missions (3 or 4 star) myself. Of course I got killed on many of these, but I took a lot of red forces with me!