| TACAN Identifiers |
|---|
| Hawaii Training Area |
|---|
| NAS Barber's Point | BRP |
| Honolulu Int A/p | HNL |
| Military OLF | HML |
| USS Enterprise | E65 |
| Korean Theatre |
|---|
| Seoul Int A/p | SOL |
| Chuncheon | CNN |
| Maeng San | MEG |
| Dongducheon | DUC |
| Kaesong | KEG |
| Ichon | ION |
| Hyonni | HYN |
| USS Enterprise | E65 |
| NAS Fallon Multiplayer area |
|---|
| NAS Fallon | NFL |
| Gabbs | GAB |
| Austin | AUS |
| Red USS Enterprise | R65 |
| Blue USS Enerprise | B65 |
| Take off |
|---|
| Pre-Flight Checklist | |
| Choose a time of day for your flight: |
| Night time | Ctrl N |
| Earlier time | Ctrl E |
| Later time | Ctrl L |
| ADJUST HUD BRIGHTNESS | Ctrl B |
| ENGINE START | |
| SHOW ENGINE DATA | E |
| Brake ON | Space |
|  |
| Start Engine | = + |
| CHECK RPM: 60-67 % | |
| FF: 3000-6000 PPH | |
| EGT: 400-550 DEG | |
|  |
| Fuel Sufficient for flight |  |
| Taxi Checklist |
|---|
| Taxi | |
| Obtain taxi clearance | Shift G |
| RPM 70 % | =+ |
| Brake OFF | Space |
| Steer with Rudders or Stick | |
| Nose Wheel High mode operates below 20 kts. This allows very tight turns. |
| Between 20 knots and takeoff speed, the steering switches to Normal NWS which responds more slowly to control inputs. |
| CAUTION Check for other traffic before turning. |
| Speed | < 20 kts |
| At the Hold Short area: | |
| Apply Brakes | Space |
| Flaps Down | F |
| Test Control Surfaces |  |
| Takeoff |
|---|
| Contact Tower | Shift T |
| RPM to 70% | = |
| Check Traffic by looking Left | KPAD 7 |
| Look Right | KPAD 9 |
| Release Brakes | Space |
| Taxi onto runway centerline |  |
| Apply Brakes | Space |
| RPM 100% | BACKSPACE |
| RPM Full Burner | BACKSPACE |
| Release Brakes | Space |
| Steer down runway centreline |
| At 130 knots pull stick 1/2 way back |
| Climb at 10 degrees |  |
| Gear Up | G |
| Burner Off | = |
| Climb to Altitude at 250 knots |  |
| Adjust pitch to maintain 350 knots |
| Level off at altitude | |
| Heading to waypoint 1 | |
|  |
| Landing the F/A-18 | |
| The sim contains excellent videos and diagrams of landing patterns and procedures. | 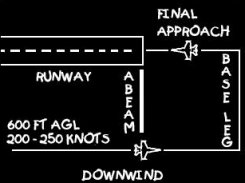 |
| Turning to Downwind | 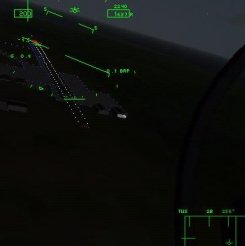 |
| Turning to final. | 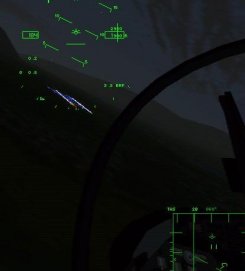 |
| The Flight Path Indicator is on the landing area. | 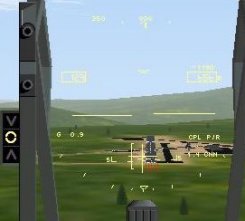 |
| Within 10 nm of airport | |
| Dump Fuel | Shift D |
| Set Altimeter to RADAR | Ctrl A |
| ILS ON | L |
| HUD DECLUTTER | Ctrl C |
| Contact Tower | Shift T |
| Upwind | |
| Head Up the Active Runway | |
| Altitude | 1500 ft |
| Speed | 300 kts |
| At the Break | |
| Bank Left 80 degrees | |
| Pull 5 to 7 G's | |
| Downwind | |
| Heading Reciprocal to Active Runway | |
| Altitude | 600 feet |
| Speed | 250 kts |
| Gear Down | G |
| Flaps Down | F |
| Abeam the Runway |
| Maintain Heading for 20 seconds |
| Altitude | 600 ft |
| Speed | 250 kts |
| Turning to Final | |
| Bank 45 Degrees Left at 2 to 3 G's | |
| ILS On | L |
| Intercept ILS | |
| On Finals | |
| Runway 4 Degrees Below HUD Centerline |
| Adjust throttle to maintain AOA | 7.6 degrees |
| Fast |  |
| On speed |  |
| Slow |  |
| Place FPI on intended landing spot |
| Touchdown | |
| No Flare | |
| Stick Forward | |
| Power to Idle | |
| Brake On | Space |
| Taxi to Parking | < 20 kts |
| Landing on Autopilot |
|---|
| Autoland Procedure | |
| ILS On | L |
| Position < 10 nm downwind of a base or carrier |
| Select Coupled Mode (CPL) | Shift A |
| Autopilot On | A |
| Adjust Throttle to maintain correct AOA |
| Carrier Ops | Takeoff |
|---|
| The Carrier deck is usually pretty crowded, so be careful taxiing, keep your speed under 10 kts and look all directions before moving. |
| 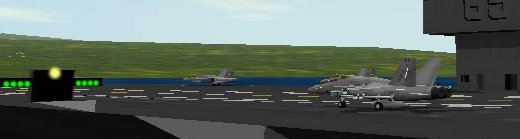 |
| Taxi | |
| Contact Ground Control | Shift G |
| Brake OFF | Space |
| Engine 70 % RPM | =+ |
| TAXI | < 10 kts |
| STOP at the CATAPULT | |
| Brake ON | Space |
| Take Off | |
| Contact Tower | Shift T |
| Brake ON | Space |
| Flaps DOWN | F |
| Stick Centred | |
| Engine Full Afterburner | Bspace x 6 |
| Brake OFF | Space |
| Stick 1/2 back | |
| Hold Velocity Vector 8 deg UP | |
| Gear UP | G |
| Flaps UP | F |
| Engine 100 % RPM | =+ |
| Climb 10 degrees UP | |
| Speed 300 kts | |
| carrier-takeoff-001 | |
| gif | |
| CLIMB TO ALTITUDE AT 300 KTS | |
| Carrier Ops | Landing |
|---|
| Contact APPROACH CONTROL to get a vector to the ship | Shift A |
| Heading 1- 4 miles ahead of ship | |
| RADAR ALTIMETER | Ctrl A |
| ILS ON | L |
| Contact Tower | Shift T |
| Downwind | |
| Hdg 3 miles abeam of ship and on a reciprocal course | |
| Altitude | 600 ft |
| Speed | 250 kts |
| Gear DOWN | G |
| Flaps DOWN | F |
| Hook DOWN | B |
| When Abeam of the Ship maintain Hdg for 20 secs |
| Base | |
| BANK LEFT at 45 DEG and 2-3 g | |
| Alt | 450 ft |
| RPM | 70 % |
| Speed | Slowing to "on speed" |
| Pitch | 1 - 2 deg nose down |
| Final at 4 miles | |
| Speed | 250 kts |
| ROD | 7 - 800 fpm |
| Pitch | 4 deg nose down |
| Velocity Vector | Place on the wires |
| AOA | 7.6 deg |
| Final at 3/4 mile | |
| in the groove | |
| TRANSITION FROM ILS TO MEATBALL |
|---|
| Call the ball | Shift L |
| Touch Down | |
| Stick FORWARD | |
| RPM | 100 % |
| Bolter | |
| Stick Gradually back | |
| Missile Defence |
|---|
| Launch Warning Tone Sounds | |
| ECM ON | |
| Attempts to jan enemy fire control radars. Alerts enemy a/c and SAM's of your position. | C |
| Locate the missile on the HUD or RWR | |
| GET VISUAL CONTACT WITH THE MISSILE | Ctrl 4 |
| Range < 4 miles> |
|---|
| Run or Evades | |
| Range < 2 miles |
|---|
| EVASIVE MANOEUVERS | |
| Dispense Flares and Chaff | ; ' |
| Manoeuver across the missile path | |
| In more than 80 % of AA kills, the attacker is never seen, so check 6 constantly. |
|  |
| Missile avoidance is explained in quite some detail in F/A-18 Korea. |
|  |
| BVR |
|---|
| Most air combat will take place Beyond Visual Range (BVR). The following checklists are presented in the order in which they will be used in most aerial combat situations. |
| Check RWR and HUD for airborne threats indicated by " I " |  |
| Turn towards the threats |  |
| Radar ON | |
| The Radar defaults to RWS mode |  |
| Adjust range | Tab |
| Select Autopilot mode | Shift A |
| Autopilot ON | A |
| AUTO DESIGNATE | / |
| OR | |
| MOVE TDC OVER CONTACT | Shift arrows |
| INTERROGATE IFF | |
| Tone = FRIENDLY | |
| Click = UNKNOWN | I |
| VIEW THE CONTACT | 5 |
| IF CONTACT IS FRIENDLY | |
| UNDESIGNATE | Shift / |
| Select RWS mode | Q |
| Check RWR and HUD for threats | |
| Execute a standard turn towards the threats | |
| IF CONTACT IS UNKNOWN | |
| Check Aspect angle | |
| Check Closure |  |
| MANOEUVER STEERING DOT INTO THE NIRD |  |
| Padlock view | 4 4 |
| Manoeuver until Range is between Rmin & Rmax |  |
| Select AIM 120 | [ |
| Range 5-7 nm | |
| SELECT AIM 9 | |
| LISTEN FOR RISING TONE INDICATING LOCK ON | |
| Within 1 mile | |
| SELECT GUN | [ |
| MiG-21 evades my AIM-120. Again. |  |
| AGM65-E Maverick and AGM-62 Walleye |
|---|
| The Maverick can accept target information from A/G Radar, FLIR or it's own sensor. |
| Range ~ 12 nm | |
| AGM-65E SENSOR | |
| Select AGM-65 sensor | O |
| Move TDC over target | Ctrl arrows |
| ZOOM IN and OUT | Ctrl + - |
| Designate Target | Ctrl / |
| Weapon release | Enter |
| AGM-65E FLIR HANDOFF | |
| FLIR ON | O |
| Select Autopilot Mode - See AP modes | Shift A |
| Move TDC over target | Ctrl ARROWS |
| Designate Target | Ctrl / |
| Hand off the target | ] |
| When IN RNG Flashes: | |
| RELEASE WEAPON | Enter |
| AGM-65E RADAR Handoff | |
| Select AGM-65 | ] |
| Radar AG or SEA mode | R, Q |
| Designate Target | / |
| Display E/O | O |
| Zoom in to ID target | Ctrl + |
| When IN RNG Flashes: | |
| RELEASE WEAPON | Enter |
| AGM-62 Walleye |
|---|
| Range 5 - 14 nm | |
| Select WE | O |
| Manoeuver the a/c until the target is in the gate | |
| Designate Target | Enter |
| When IN RNG Flashes: | |
| RELEASE WEAPON | Enter |
| AGM-88 HARM |
|---|
| HARM missile |  |
| DISPLAY HARM | U |
| Note: the field of view is 60 deg by 60 deg |
| Designate Target | Ctrl / |
| When IN RNG cue flashes: | |
| Wpn RELEASE | Enter |
| Your first indication of SAM and AAA sites will probably come from the HUD. | 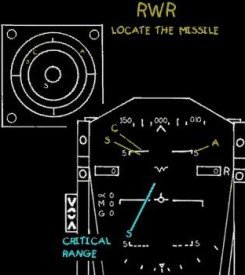 |
| Auto FLIR Loft |
|---|
| Distance 10 nm from target | |
| Altitude | 500 ft |
| Speed | > 400 kts |
| Select Ordnance | ] |
| FLIR ON | O |
| Select Autopilot Mode See APmodes | Shift A |
| Move TDC over target | Ctrl ARROWS |
| Designate Target | Ctrl / |
| HAND OFF the TARGET | ] |
| When a release cue appears at the top of the HUD: |
| Pull up | @ 4G |
| Continue until inverted and 45 deg nose low |
| Roll the wings level | |
| Egress | |
| FLIR Hand Off | |
| Select Weapon | ] |
| FLIR ON | O |
| Select Autopilot Mode - See APmodes | Shift A |
| Move TDC over target | Ctrl ARROWS |
| Designate Target | Ctrl / |
| HAND OFF the TARGET | ] |
| FLY TO A RELEASE SOLUTION | |
| Laser Guided |
|---|
| Select Weapon | ] |
| HUD DISPLAYS LST (Laser Spot Tracker) | |
| Select AUTO Mode | Shift ] |
| Head Towards Target | |
| Altitude | > 4,000 ft |
| Speed | 250 - 400 kts |
| When the target disappears below the nose: |
| ROLL INVERTED | |
| DIVE | 10 - 25 DEG |
| ROLL LEVEL | |
| Place the velocity vector over the target | |
| Designate the target | Enter |
| Pull up smoothly until the bomb comes off |
| REMAIN OVER 1000 ft |
| Air to Ground Radar Checklists |
|---|
| AG RADAR ON | R |
| R toggles AA and AG modes | |
| MODE SELECT | Q |
| Fixed Targets | MAP or EXP 1 |
| Moving Targets | GMT |
| Sea Targets | SEA |
| Adjust Range | Tab |
| Designate Target | |
| Auto Release Dive Bomb |
|---|
| Select Weapon | ] |
| SELECT AUTO MODE | Shift ] |
| Head Towards Target | |
| Altitude | > 4,000 ft |
| Speed | 250 - 400 kts |
| When the target disappears below the nose |
| Roll Inverted | |
| DIVE | 10 - 25 DEG |
| ROLL LEVEL | |
| Place the velocity Vector over the target | |
| Designate | Enter |
| Pull up smoothly until the bomb comes off |
| Altitude | < 1,000 ft |
| AA emplacement | 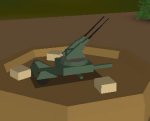 |
| Auto FLIR |
|---|
| Select Ordnance | ] |
| FLIR on | O |
| SELECT Autopilot mode | |
| See AP modes | Shift A |
| MOVE TDC OVER TARGET | CTRL and arrow keys |
| Designate Target | CTRL / |
| Hand off the Target | ] |
| High Pop Up |
|---|
| At distance 6 nm | |
| Altitude | < 500 ft |
| Speed | > 400 kts |
| Afterburner ON | Bspace |
| PULL UP | 45 deg |
| Head 10 deg left or right | |
| Select Ordnance | ] |
| Select AUTO mode | Shift ] |
| Altitude | 13,000 ft |
| ROLL 135 deg towards target | |
| Afterburner OFF | - |
| Chaff and Flares | ; ' |
| LEVEL WINGS | |
| DESIGNATE OR USE CCIP | |
| Low Drag CCIP Delivery |
|---|
| Select Weapon | ] |
| Head Towards Target | |
| Altitude | 7,000 ft |
| Speed | 250 - 450 kts |
| Acquire on radar or visually | |
| When the target disappears below the nose. |
| Dive | 10 to 30 deg |
| When the CCIP Impact cross reaches the target. |
| Weapon RELEASE | Enter |
| Low Level Pop Up |
|---|
| At distance 4 nm | |
| PULL UP | 30 deg |
| Head 15 deg Left or right | |
| Select Ordnance | ] |
| Alt | 3,000 ft |
| ROLL 135 deg towards target | |
| LEVEL WINGS | |
| Designate or use CCIP | |
| Release at Alt | > 1000 ft |
| Comms |
|---|
| Good communication with your wingman is the only way you will handle multiple threats effectively. |
| Refer to the F/A-18 Hornet Korea manual page 175 for an explanation of verbal messages from your wingmen. |
| GND CONTROL (COM 1) |
|---|
| Ground Control | Shift G |
| Control Tower | Shift T |
| Flight Ops | Shift O |
| Approach Control | Shift C |
| Landing Signal Officer | Shift L |
| Wingman Messages |
|---|
| FORMATION | |
| Add Shift to talk to second wingman. | |
| Trail Formation | F10 |
| Echelon Formation | F9 |
| Lead | F12 |
| Combat Spread | F11 |
| ATTACK | |
| Add Shift to talk to second wingman. | |
| Engage | F2 |
| Resume Mission | F3 |
| Lead | F12 |
| Bracket Left | F5 |
| Bracket Right | F6 |
| Split High | F7 |
| Split Low | F8 |
| Help Me | F1 |
| Return to Base | F4 |
| F/A-18 Autopilot modes |
|---|
| Using the Autopilot allows you time to safely look down in the cockpit, for example when jettisoning a fuel tank. |
| With it's various modes the autopilot is a valuable way of managing the pilot workload. |
| Select Mode | |
| The mode selected is displayed in the HUD and the UFC | Shift A |
| Basic Mode: levels the wings if < 5 deg bank | maintains bank if > 5 deg bank |
| ATTH | Attitude Hold | Maintains current pitch and bank |
| HSEL | Captures current waypoint heading |
| BALT | Captures current pressure altitude and maintains current hdg |
| RALT | Captures current Radar altitude and maintains current hdg |
| CPL | Navigates to the current TCN |
| If <10 nm from a runway/carrier and the ILS is on. CPL mode will autoland the a/c |
| Activate Autopilot | A |
| Using the Autopilot allows you time to safely look down in the cockpit, for example when jettisoning a fuel tank. | 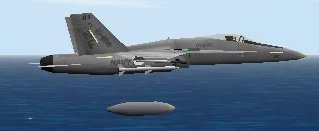 |
| HSD and MMD | |
| Horizontal Situation Display | |
| Most navigation information is displayed in the HSD ( Horizontal Situation Display). |
| Look Down | 2 |
| Select HSD | N |
| Adjust Scale | N |
| A key to the symbology on the HSD |  |
| Moving Map Display | |
| Look Down | 2 |
| Select Map | M |
| Adjust Scale | M |
| Moving Map Display |  |
| Navigation |
|---|
| TACAN | |
| Select TACAN | |
| The Station Identifier is displayed in the HUD and on the UFC |
| Within 30 nm | |
| REQUEST VECTORS | |
| Note: If you have a waypoint selected, not a TACAN beacon, Approach Control will vector you to the airport nearest your current position. | Shift C |
| Use the TACAN to steer you Back to base. | 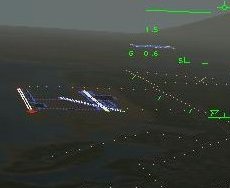 |
| checklist-hasell | |
| HASELL |
|---|
| The HASELL scan should be conducted continously during flight. |
| Element | Source |
| Heading | HUD |
| Altitude | HUD |
| Speed | HUD |
| Engines | IFEI |
| hasell-ifei | |
| Lookout | |
| look BACK, BACK Right, Right, Left, BACK Left |
| Location | |
| refer to the MAP display and confirm by visual reference to landmark |  |
| And confirmed by visual reference to a landmark. |  |
| Heading Altitude and Speed can be seen on the HUD |  |
| Fuel and flight time remaining at present RPM is shown on the IFEI |  |